How I Set Up SG for Unity
Source generators in C# are pretty cool, but not everyone knows how to use them effectively. Less talk - more code.
Basics:
We'll create a package consisting of three parts:
- Runtime - the runtime code of the project; our generator will be applied to this assembly and all its dependencies
- Editor - if needed, but usually required
- The generator itself - there are two options here: a full package or a DLL, we'll cover the second option in this post.
We're making it a package for two reasons: first, it allows us to isolate dependencies, and second, we can reuse the package between projects.
Prepare all the folders and files in the Packages folder of the project:
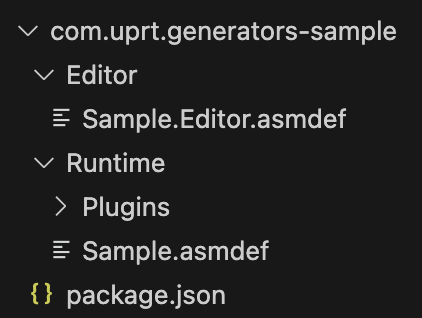
No need to explain the contents - it's a standard package.
Generator:
We'll keep everything minimalistic, so we'll create the generator from a DLL, but you can also use Rider's template with tests and a configured debugger.
Add the generator project by opening a terminal in the package folder and typing:
dotnet new classlib -n SampleGenerator -o ./src~ -f netstandard2.0
SampleGenerator is the name of your generator; it's better to name it as [package-name]Generator.
This will generate a project with a DLL without a solution. In our case, this is what we need.
If you want a full package, create a solution from the template in Rider or Visual Studio inside the ./src~ folder.
The tilde at the end of the folder name will make it invisible to Unity, so you can do whatever you want there.
Now we need to modify the generator project for compatibility with Unity.
Open the project file in VS Code:
code ./src~/
And change the contents:
<Project Sdk="Microsoft.NET.Sdk">

  <!-- project settings, feel free to tweak them as needed -->
  <PropertyGroup>
      <!-- Unity requires this specific version -->
      <TargetFramework>netstandard2.0</TargetFramework>
      <Nullable>disable</Nullable>
      <IsPackable>false</IsPackable>
      <LangVersion>latest</LangVersion>
      <!-- prevent the 'netstandard2.0' folder from being generated during build -->
      <AppendTargetFrameworkToOutputPath>false</AppendTargetFrameworkToOutputPath>
      <EnforceExtendedAnalyzerRules>true</EnforceExtendedAnalyzerRules>
      <IsRoslynComponent>true</IsRoslynComponent>
  </PropertyGroup>

  <!-- copy the output to a folder visible to Unity after building in release -->
  <Target Name="PostBuild" AfterTargets="PostBuildEvent" Condition=" '$(Configuration)' == 'Release' ">
      <Exec Command="cp bin/$(Configuration)/$(ProjectName).dll ../Runtime/Plugins/"/>
  </Target>

  <!-- packages that turn the DLL into an analyzer -->
  <ItemGroup>
      <PackageReference Include="Microsoft.CodeAnalysis" Version="4.0.1" PrivateAssets="all"/>
      <PackageReference Include="Microsoft.CodeAnalysis.CSharp" Version="4.0.1" PrivateAssets="all"/>
  </ItemGroup>

</Project>For Unity versions earlier than 2022, the package versions should be 3.8.0.
Open Class1.cs in the project and insert the following code:
using Microsoft.CodeAnalysis;

[Generator]
public class ExampleSourceGenerator : ISourceGenerator
{
    public void Initialize(GeneratorInitializationContext context) { }

    public void Execute(GeneratorExecutionContext context)
    {
        const string source = @"
// THIS CODE IS AUTO GENERATED, YAY

public static class ExampleGeneratedCode
{
    [UnityEngine.RuntimeInitializeOnLoadMethod]
    public static void HelloSourceGenerators() => UnityEngine.Debug.Log(""Hello from source generator"");
}
";

        context.AddSource("Sample.g.cs", source);
    }
}Integration:
Now we need to make sure the generator is correctly picked up by Unity, for this we need to build it first (:
dotnet publish -c Release ./src~
Switch to Unity so it can load the freshly built DLL. We need the generated meta file as we will be supplying it with the project.
Open the DLL importer settings, disable all platforms including the editor, and add the RoslynAnalyzer label - all according to the Unity guide.
Result:
We've set up the generator and it will work on the assembly (asmdef) located in our runtime folder and all assemblies referencing it.
To trigger the generation:
- Create any empty script in the Runtime folder.
- Open the project in Rider or Visual Studio.
- Switch to Solution View.
- Check the contents of the assembly.

Voila! Our generated code. And if you enter play mode, you can see the debug log message.